前言
一直想给博客添加个说说功能,但是没时间搞,今天就来嗦一下 hexo 框架下 butterfly 主题的 artitalk 说说部署和踩坑
部署教程
按照 artitalk 教程部署
看不懂?没关系往下接着看
图文教程
- 申请
leancloud中国版账号,国际版也可以,但是需要自行添加域名,因为自 2022 年 8 月起,国际版共享域名不再向中国大陆提供服务。
leancloud - 创建应用
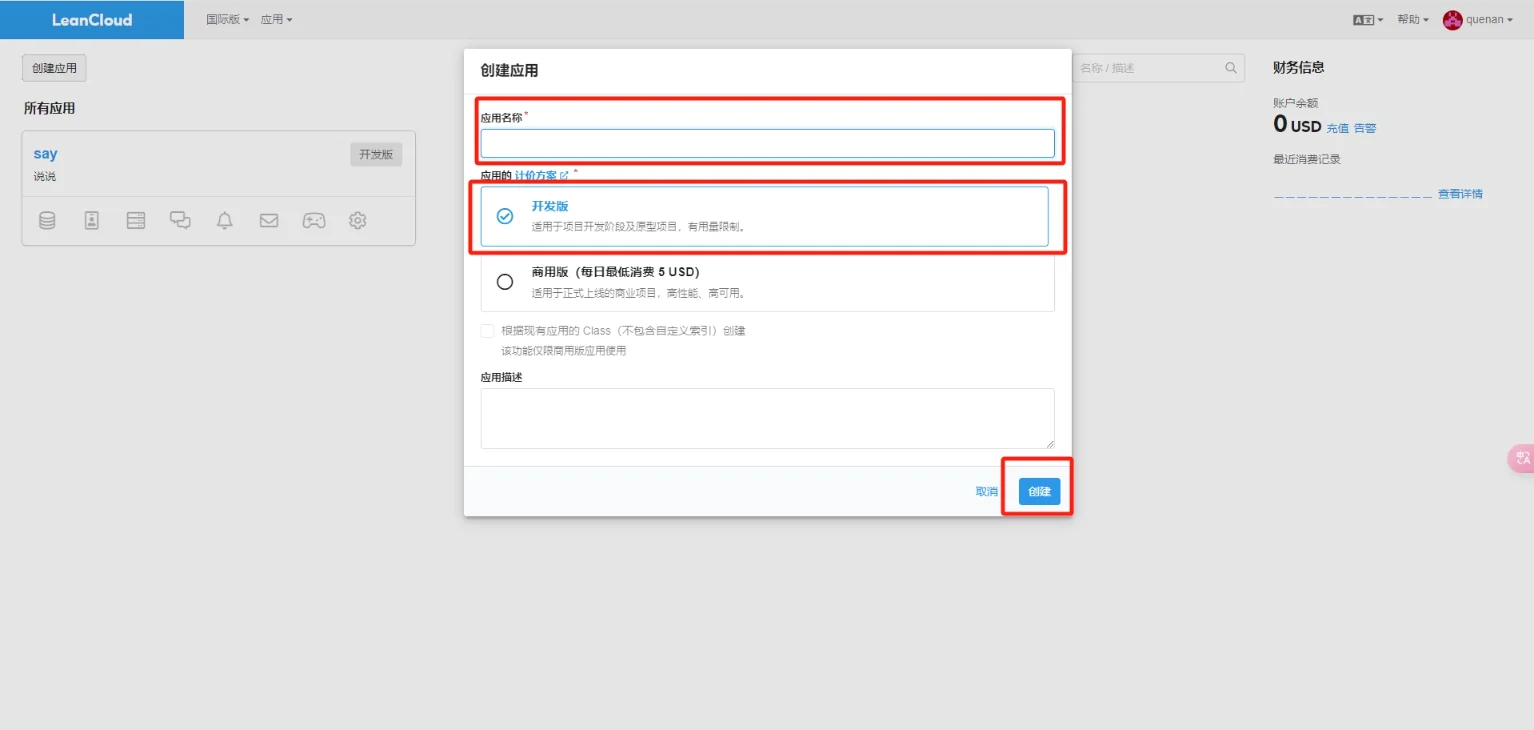
名称任意,选择开发版 - 点击齿轮状的图标进入设置
数据储存->结构化数据->_user->添加行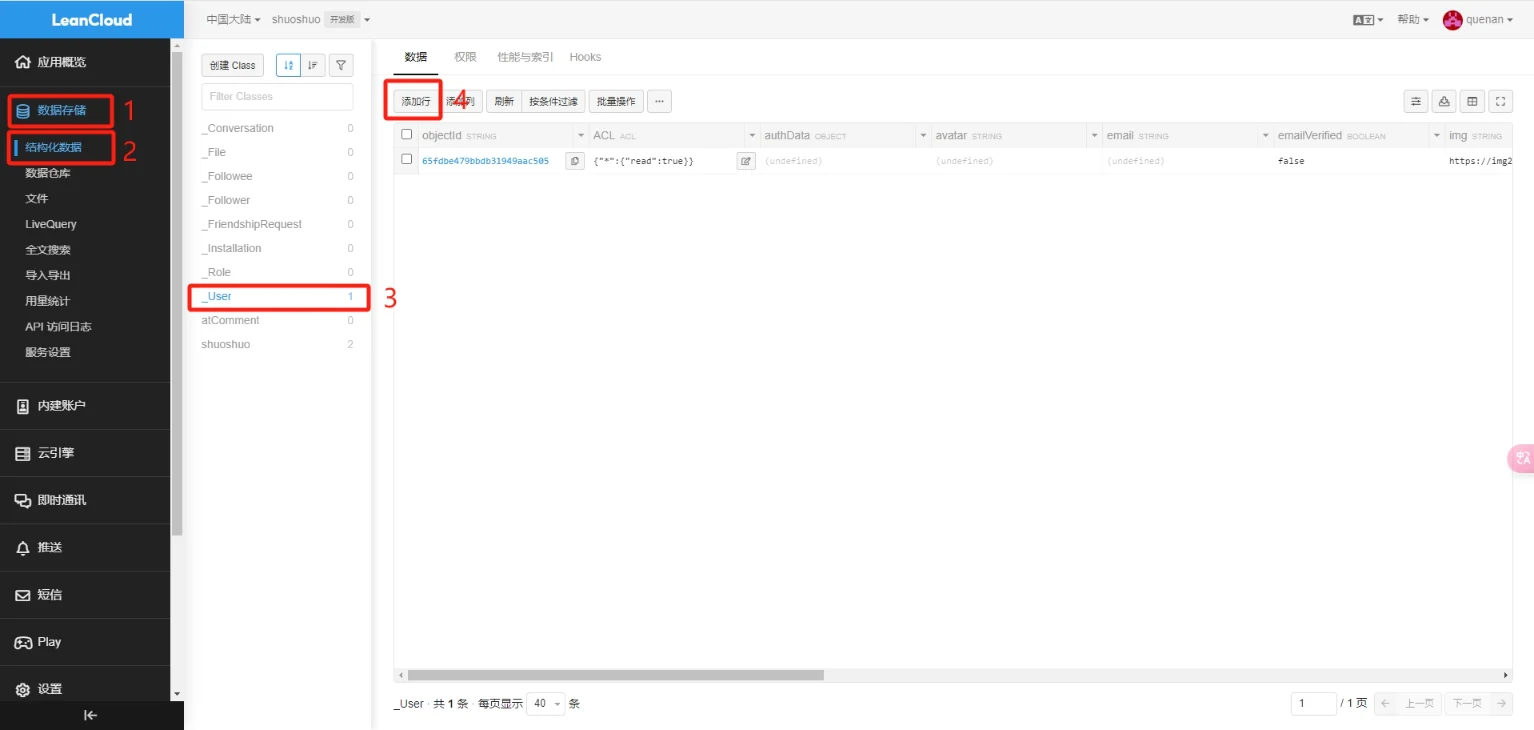
password填入密码,username填入用户名,其他保持默认问题orange, 此处的用户名和账号是在前端登陆用的
数据储存->结构化数据->创建Class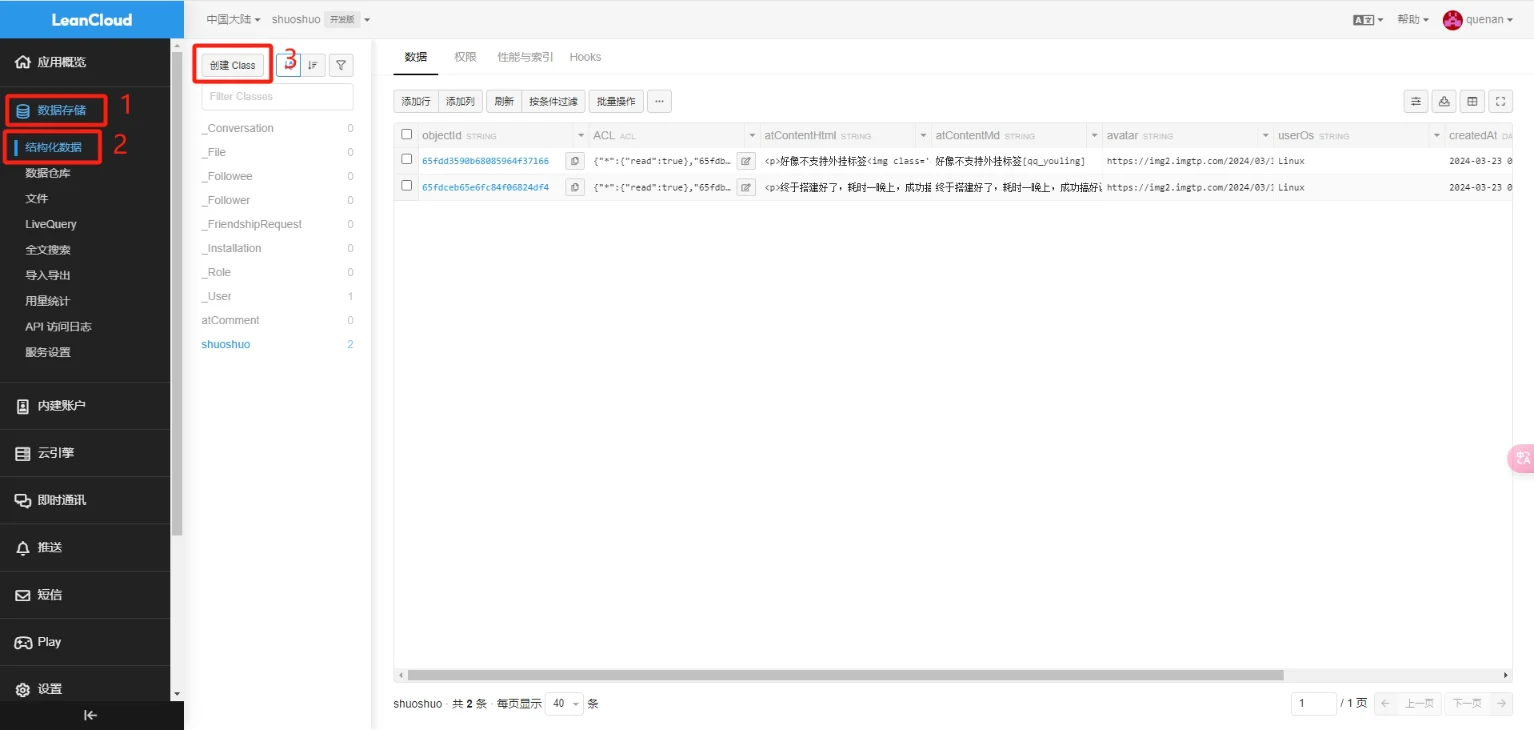
class名称填写shuoshuo,访问权限把红框框选的选项全部改为指定用户访问,用户输入上一步填写的用户名,稍等片刻选择下拉框中对应的用户即可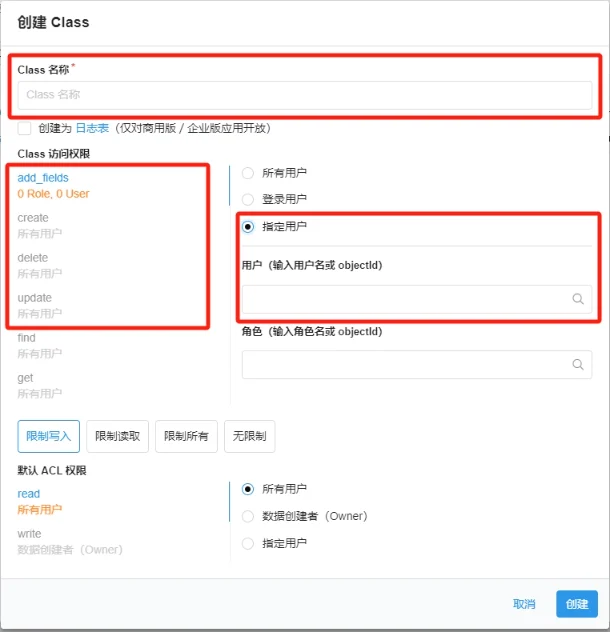
- 重复上一步的操作,创建名为
atComment的 Class 类,权限保持默认即可 - 进入
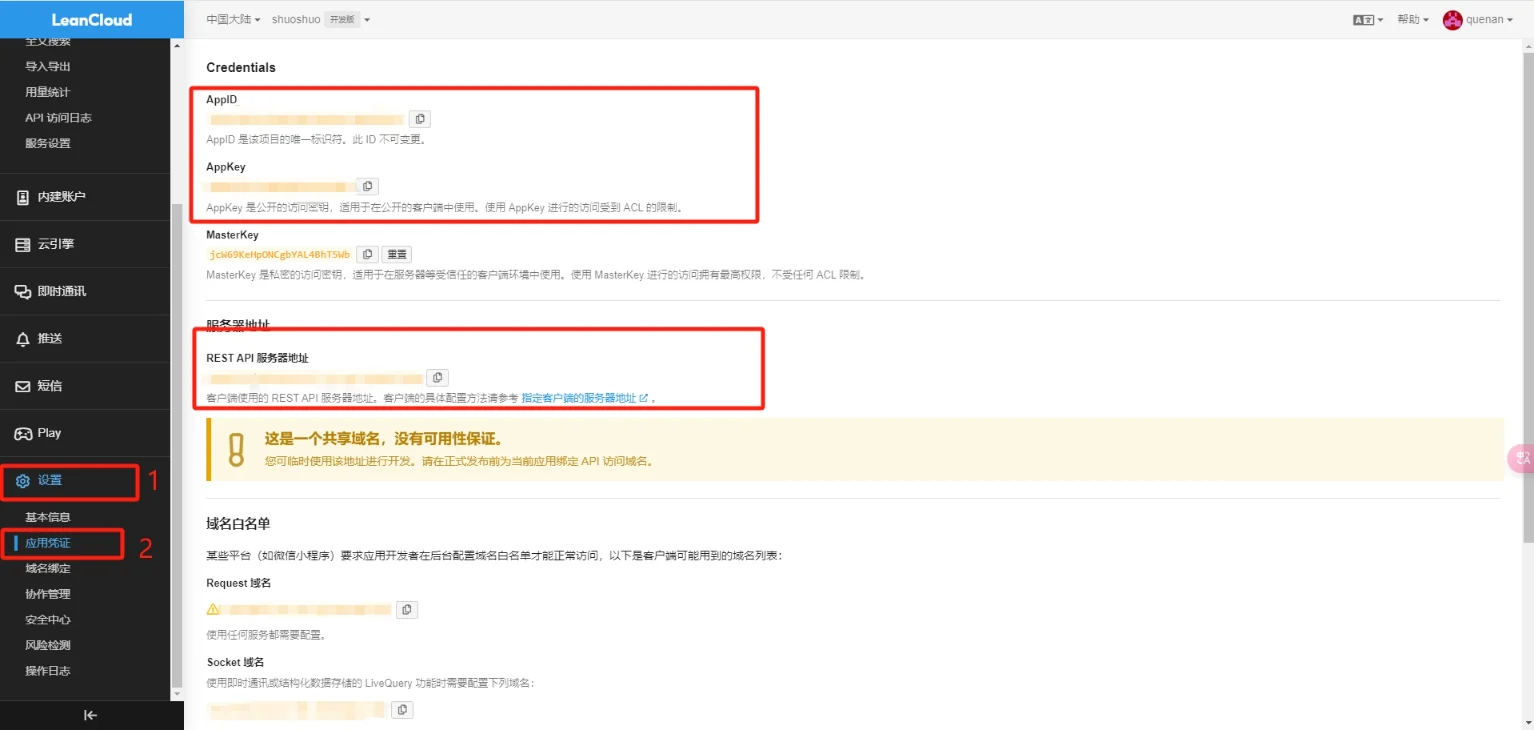
设置->应用凭证,记下AppIDAppKeyAPI服务地址 - 在博客目录下打开终端,运行
shell hexo new page artitalk # 此处的artitalk可以自定义
- 进入
artitalk/index.md,加入如下代码html <script type="text/javascript" src="https://unpkg.com/artitalk"></script> <div id="artitalk_main"></div> <script> new Artitalk({ appId: "你的AppID", appKey: "你的AppKey", serverURL: "你的API地址", atComment: 0, }); </script> - 运行 hexo 三件套启动,进入
你的域名/artitalk就可以看见说说页面了
我的 artitalk 样式参考
/* 说说 */

#artitalk_main .cbp_tmtimeline > li .cbp_tmlabel {
  color: #000 !important;
  border: 2px solid #e5e5e5;
  border-radius: 15px !important;
  background: none !important;
  box-shadow: none !important;
}

[data-theme="dark"] #artitalk_main .cbp_tmtimeline > li .cbp_tmlabel {
  color: #fff !important;
}

#artitalk_main .cbp_tmlabel.cbp_tmlabel:hover {
  box-shadow: 0 15px 32px rgba(0, 0, 0, 0.15) !important;
}

#artitalk_main .cbp_tmtimeline > li .cbp_tmlabel:after {
  display: none;
}

#artitalk_main span.cbp_tmlabel > p {
  display: flex;
}

#artitalk_main span.cbp_tmlabel > p span:not(:last-child) {
  border: 2px solid #e5e5e5;
  padding: 5px;
  text-align: center;
  border-radius: 15px;
  margin: 0 10px;
  display: flex;
}

#artitalk_main p.shuoshuo_time {
  border-top: none !important;
}

#artitalk_main span.cbp_tmlabel > p span:nth-child(1)::after,
#artitalk_main span.cbp_tmlabel > p span:nth-child(1)::before {
  content: "";
  width: 13px;
}

#artitalk_main span.cbp_tmlabel > p span:nth-child(2)::after {
  content: "";
  width: 13px;
}

#artitalk_main span.cbp_tmlabel > p svg {
  width: 15px;
  height: 15px;
  margin-right: 5px;
}

#artitalk_main span.cbp_tmlabel > p svg path {
  fill: #000;
}

#artitalk_main .delete_right svg path {
  fill: #000;
}

[data-theme="dark"] #artitalk_main span.cbp_tmlabel > p svg path {
  fill: #fff;
}

[data-theme="dark"] #artitalk_main .delete_right svg path {
  fill: #fff;
}

#artitalk_main .at_button {
  width: 150px;
  background: #fff !important;
  color: #000 !important;
  outline: 2px solid #e5e5e5 !important;
  transition: all 0.3s;
}

[data-theme="dark"] #artitalk_main .at_button {
  background: #1a1a1b !important;
  color: #fff !important;
}

#artitalk_main span.cbp_tmlabel > p span:nth-child(3) {
  display: none !important;
}

#artitalk_main .at_button:hover {
  background: var(--theme-color) !important;
  color: #fff !important;
  outline: 2px solid #fff !important;
}

@media (max-width: 768px) {
  #artitalk_main span.cbp_tmlabel > p {
    flex-direction: column;
  }

  #artitalk_main span.cbp_tmlabel > p span:not(:last-child) {
    margin: 5px 0;
  }

  #artitalk_main span.cbp_tmlabel > p span:nth-child(1) {
    width: 110px;
  }

  #artitalk_main span.cbp_tmlabel > p span:nth-child(2) {
    width: 160px;
  }
}

/* 说说 end */
食用教程

- 第一个:发布
- 第二个:用户信息
- 第三个:发送图片
可能出现的问题
- 表情无法加载

解决方法: 替换 artitalk.js 中的 https://fastly.jsdelivr.net 为别的可用 jsdelivr 镜像,或者挂魔法全部下载下来,再替换为自己的链接
评论区
评论加载中...